


一 服务容错保护
1.1 为什么要容错保护
在微服务架构中,我们将系统拆分成了很多服务单元,各单元的应用间通过服务注册与订阅的方式互相依赖。由于每个单元都在不同的进程中运行,依赖通过远程调用的方式执行,这样就有可能因为网络原因或是依赖服务自身问题出现调用故障或延迟,而这些问题会直接导致调用方的对外服务也出现延迟,若此时调用方的请求不断增加,最后就会因为等待出现故障的依赖方响应形成任务积压,最终导致自身服务的瘫痪。
举个例子,在一个电商网站中,我们可能会将系统拆分成用户、订单、库存、积分、评论等一系列服务单元。用户创建一个订单的时候,客户端将调用订单服务的创建订单接口,此时创建订单接口又会向库存服务来请求出货。此时若库存因自身逻辑等原因造成响应缓慢,会直接导致创建订单服务的线程被挂起,以等待库存申请服务的响应,在漫长的等待之后用户会因为请求库存失败而得到创建订单失败的结果。如果在高并发的情况下,因这些挂起的线程在等待库存服务的响应而未能释放,使得后续到来的创建订单请求被阻塞,最终导致订单服务也不可用。
在微服务架构中,存在着很多的服务单元,若一个单元出现故障,就很容易因依赖关系而引发故障的蔓延,最终导致整个系统的瘫痪,这样的架构相比较传统架构更加不稳定,为了解决这样的问题,产生了断路器等一系列服务保护机制。
在分布式架构中,断路器模式的作用也是类似的,当某个服务单元发生故障之后,通过断路器的故障监控,向调用方返回一个错误响应,而不是长时间的等待。这样就不会使得线程因调用故障服务被长时间占用不释放,避免了故障在分布式系统中的蔓延。
1.2 Spring Cloud Hystrix 快速入门
如下图所示,这是我本次演示的示例
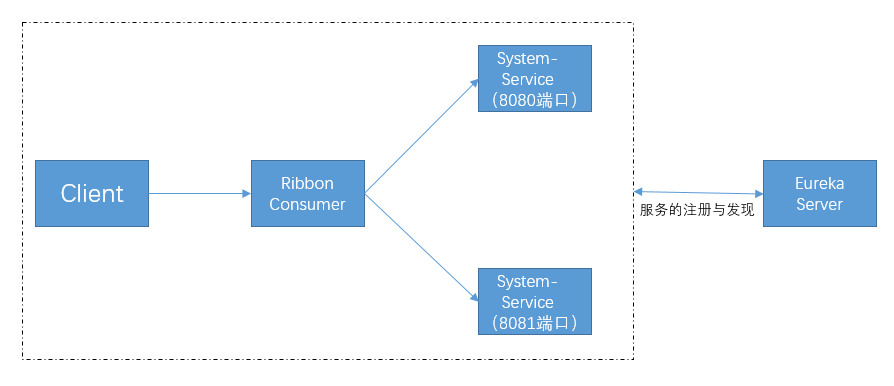
eureka-server 工程:服务注册中心
system-service 工程:提供服务的工程,两个实例启动端口号分别为 8090 和 8091
ribbon-consume 工程:使用 Ribbon 实现的服务消费者,端口号为 8080
1.2.1 Eureka-Server
创建 Maven 工程,工程名 eureka-server,提供服务注册的功能。具体的在这不不多做介绍了。请求 Eureka 章节。工程源码如下
eurekaserver.zip
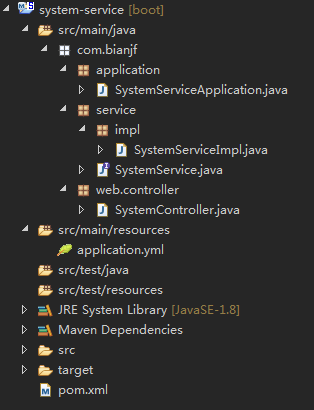
1.2.2 System-Service
分别使用 8090 和 8091 端口启动两个系统服务的启动端口,组成服务计算集群。工程目录结构如下
添加的依赖包如下
         <dependency>
             <groupId>org.springframework.boot</groupId>
             <artifactId>spring-boot-starter-web</artifactId>
         </dependency>
         <dependency>
             <groupId>org.springframework.boot</groupId>
             <artifactId>spring-boot-starter-test</artifactId>
         </dependency>
         <dependency>
         <dependency>
             <groupId>org.springframework.cloud</groupId>
             <artifactId>spring-cloud-starter-eureka</artifactId>
         </dependency>
提供的数据服务 SystemController 如下
package com.bianjf.web.controller;
import java.util.HashMap;
import java.util.Map;
import org.slf4j.Logger;
import org.slf4j.LoggerFactory;
import org.springframework.beans.factory.annotation.Autowired;
import org.springframework.beans.factory.annotation.Value;
import org.springframework.web.bind.annotation.PathVariable;
import org.springframework.web.bind.annotation.RequestMapping;
import org.springframework.web.bind.annotation.RequestMethod;
import org.springframework.web.bind.annotation.RestController;
import com.bianjf.service.SystemService;

@RestController
public class SystemController {
    private final Logger LOGGER = LoggerFactory.getLogger(this.getClass());

    /** 访问的端口号 */
    @Value("${server.port}")
    private Integer serverPort;


    @Autowired
    private SystemService systemService;

    @RequestMapping(value = "/system/{name}/find/person", method = RequestMethod.GET)
    public Map<String, Object> findPerson(@PathVariable("name") String name) {
        Map<String, Object> resultMap = new HashMap<>();
        resultMap.put("port", this.serverPort);
        try {
            Map<String, Object> personMap = this.systemService.getPersonByName(name);
            resultMap.put("result", true);
            resultMap.put("msg", "查询成功");
            resultMap.put("data", personMap);
        } catch (Exception e) {
            this.LOGGER.error("查询用户系统错误。=====>", e);
            resultMap.put("result", false);
            resultMap.put("msg", "查询用户失败");
            return resultMap;
        }

        return resultMap;
    }
}
通过@Value读取配置文件中的端口号,用来标识客户端访问了哪个服务器。在配置文件中配置如下
spring:
  application:
    name: system-service
eureka:
  client:
    service-url:
      defaultZone: http://localhost:8761/eureka
---
spring:
  profiles: system-service-node-01
server:
  port: 8090
---
spring:
  profiles: system-service-node-02
server:
  port: 8091
启动时加参数–spring.profiles.active,即可启动对应的端口的服务了。
具体工程源码如下
systemservice.zip
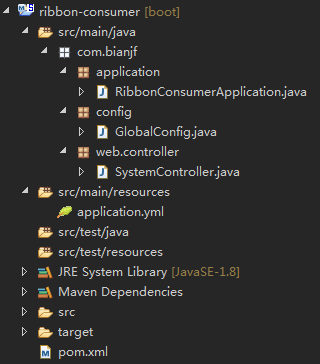
1.2.3 Ribbon-Consumer
通过 Ribbon 完成服务的消费端,提供给客户端的访问接口。工程目录结构如下
需要的依赖包如下
         <dependency>
             <groupId>org.springframework.boot</groupId>
             <artifactId>spring-boot-starter-web</artifactId>
         </dependency>
         <dependency>
             <groupId>org.springframework.boot</groupId>
             <artifactId>spring-boot-starter-test</artifactId>
         </dependency>
         <dependency>
             <groupId>org.springframework.boot</groupId>
             <artifactId>spring-boot-starter-actuator</artifactId>
         </dependency>
         <dependency>
             <groupId>org.springframework.cloud</groupId>
             <artifactId>spring-cloud-starter-eureka</artifactId>
         </dependency>
         <dependency>
             <groupId>org.springframework.cloud</groupId>
             <artifactId>spring-cloud-starter-hystrix</artifactId>
         </dependency>
         <dependency>
             <groupId>org.springframework.cloud</groupId>
             <artifactId>spring-cloud-starter-ribbon</artifactId>
         </dependency>
需要加入 Ribbon 和 Hystrix 的依赖包
配置文件 application.yml 如下
spring:
  application:
    name: ribbon-consumer
server:
  port: 8080
eureka:
  client:
    service-url:
      defaultZone: http://localhost:8761/eureka
指定注册中心地址,进行服务发现的功能。
Spring Boot 启动类如下
package com.bianjf.application;
import org.springframework.boot.SpringApplication;
import org.springframework.boot.autoconfigure.SpringBootApplication;
import org.springframework.cloud.client.circuitbreaker.EnableCircuitBreaker;
import org.springframework.cloud.client.discovery.EnableDiscoveryClient;
import org.springframework.context.annotation.ComponentScan;

@ComponentScan(basePackages = {"com.bianjf.web", "com.bianjf.config"})//扫描其他包的注解
@EnableCircuitBreaker//开启断路器功能
@EnableDiscoveryClient//开启服务发现功能
@SpringBootApplication
public class RibbonConsumerApplication {
    public static void main(String[] args) {
        SpringApplication.run(RibbonConsumerApplication.class, args);
    }
}
加入@EnableCircuitBreaker,开启断路器的功能。
注意:这里还可以使用 Spring Cloud 应用中的@SpringCloudApplication注解来修饰应用主类,该注解的具体定义如下
/**
 * @author Spencer Gibb
 */
@Target(ElementType.TYPE)
@Retention(RetentionPolicy.RUNTIME)
@Documented
@Inherited
@SpringBootApplication
@EnableDiscoveryClient
@EnableCircuitBreaker
public @interface SpringCloudApplication {
}
可以看到该注解中包含了上述我们所引用的三个注解。这也意味着一个 Spring Cloud 标准应用应包含服务发现以及断路器。
全局配置类 GlobalConfig 如下
package com.bianjf.config;
import org.springframework.cloud.client.loadbalancer.LoadBalanced;
import org.springframework.context.annotation.Bean;
import org.springframework.context.annotation.Configuration;
import org.springframework.web.client.RestTemplate;

/**
* 全局配置类
*
*/
@Configuration
public class GlobalConfig {
    /**
     * RestTemplate集群
     * @return
     */
    @Bean
    @LoadBalanced
    public RestTemplate getRestTemplate() {
        return new RestTemplate();
    }
}
提供访问接口的 SystemController 如下
package com.bianjf.web.controller;
import java.util.HashMap;
import java.util.Map;
import org.springframework.beans.factory.annotation.Autowired;
import org.springframework.web.bind.annotation.PathVariable;
import org.springframework.web.bind.annotation.RequestMapping;
import org.springframework.web.bind.annotation.RestController;
import org.springframework.web.client.RestTemplate;
import com.netflix.hystrix.contrib.javanica.annotation.HystrixCommand;

@RestController
public class SystemController {
    @Autowired
    private RestTemplate restTemplate;

    /** 系统服务的基础URL */
    private final String SYSTEM_SERVICE_BASE_URL = "http://SYSTEM-SERVICE";

    @SuppressWarnings("unchecked")
    @RequestMapping(value = "/user/{name}/findUser")
    @HystrixCommand(fallbackMethod = "defaultFallback")
    public Map<String, Object> findUser(@PathVariable("name") String name) {
        Map<String, Object> paramsMap = new HashMap<>();
        paramsMap.put("name", name);

        return this.restTemplate.getForObject(this.SYSTEM_SERVICE_BASE_URL + "/system/{name}/find/person", Map.class, paramsMap);
    }

    /**
     * 全局断路,服务降级方法
     */
    @SuppressWarnings("unused")
    private Map<String, Object> defaultFallback(String name) {
        Map<String, Object> resultMap = new HashMap<>();
        resultMap.put("result", false);
        resultMap.put("msg", "系统错误");
        return resultMap;
    }
}
在访问的接口方法上增加了@HystrixCommand注解来指定回调方法。注意,该回调方法要与@HystrixCommand 修饰的方法在返回值和参数上要一致
这样,当我们在访问服务的时候,如果后台服务中有一个服务挂了,就会进行快速熔断的服务降级功能,避免在高并发环境中因访问堆积而造成线程池耗尽且线程无法释放的服务雪崩情况。
具体工程源码如下
ribbonconsumer.zip
二 Spring Cloud Hystrix 原理分析
2.1 原理分析
2.1.1 工作流程
如下图所示
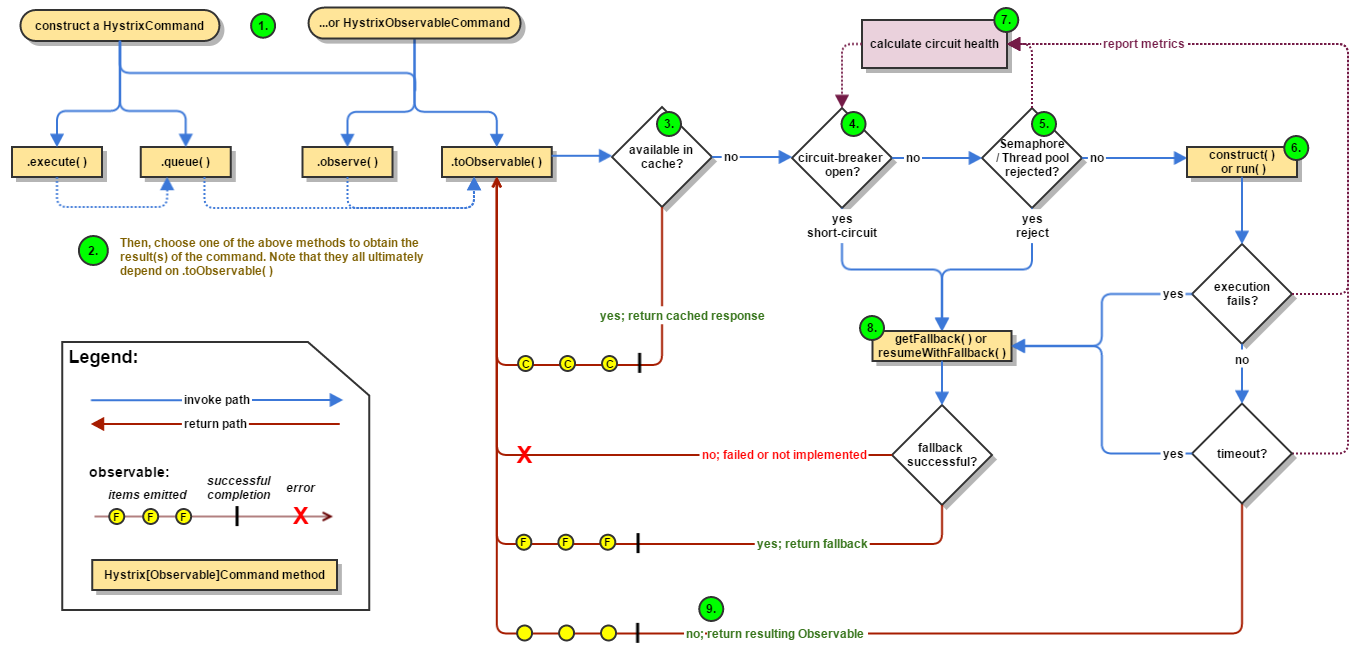
2.1.1.1 创建 HystrixCommand 或 HystrixObservableCommand 对象
首先,构建一个 HystrixCommand 或是 HystrixObservableCommand 对象,用来表示对依赖服务的操作请求,同时传递所有需要的参数。从其命名中我们就知道它采用了“命令模式”来实现对服务调用操作的封装。而这两个 Command 对象分别针对不同的应用场景
HystrixCommand:用在依赖的服务返回单个操作结果的时候
HystrixObservableCommand:用在依赖的服务返回多个操作结果的时候
命令模式,将来自客户端的请求封装成一个对象,从而让你可以使用不同的请求对客户端进行参数化。它就可以被用于实现“行为请求者”与“行为实现者”的解耦,以便使两者可以适应变化。下面的示例是对命令模式的简单实现:
/**
 * 命令接受者
 *
 */
public class Receiver {
    public void action() {
         //执行真正的业务逻辑
    }
}
/**
 * 抽象命令
 *
 */
public interface Command {
    public void execute();
}

/**
 * 具体命令实现
 *
 */
public class ConcreateCommand implements Command {
    private Receiver receive;
    public ConcreateCommand(Receiver receive) {
         this.receive = receive;
    }
    @Override
    public void execute() {
         this.receive.action();
    }
}
/**
 * 客户端调用者
 *
 */
public class Invoker {
    private Command command;
    public Command getCommand() {
         return command;
    }
    public void setCommand(Command command) {
         this.command = command;
    }

    public void action() {
         this.command.execute();
    }
}
/**
 * 客户端
 *
 */
public class Client {
    public static void main(String[] args) {
         Receiver receiver = new Receiver();
         Command command = new ConcreateCommand(receiver);
         Invoker invoker = new Invoker();
         invoker.setCommand(command);
         invoker.action();
    }
}
从代码中,我们可以看到这样几个对象:
- Receiver:接受者,它知道如何处理具体的业务逻辑
- Command:抽象命令,它定义了一个命令对象应具备的一系列命令操作,比如 execute()、undo()、redo()等。当命令操作被调用的时候就会触发接受者去做具体命令对应的业务逻辑
- ConcreateCommand:具体的命令实现,在这里它绑定了命令操作与接收者之间的关系,execute()命令的实现委托给了 Receiver 的 action()函数
- Invoker:调用者,它持有一个命令对象,并且可以在需要的时候通过命令对象完成具体的业务逻辑
从上面的示例中,我们可以看到,调用者 Invoker 与操作者 Receiver 通过 Command 命令接口实现了解耦。对于调用者来说,我们可以为其注入多个命令操作,比如新建文件、复制文件、删除文件这样三个操作,调用者只需在需要的时候直接调用即可。这里的 HystrixCommand 和 HystrixObservableCommand 则是在 Hystrix 对 Command 的进一步抽象定义。
Invoker 和 Receiver 的关系非常类似于“请求-响应”模式,所以它比较适用于实现记录日志、撤销操作、队列请求等。
在下面这些情况应考虑使用命令模式:
- 使用命令模式作为“回调(CallBack)”在面向对象系统中的替代。“CallBack”讲的便是先将一个函数登记上,然后再以后调用次函数
- 需要在不同的时间指定请求、将请求排队。一个命令对象和原先的请求发出者可以有不同的生命周期。换言之,原先的请求发出者可能已经不在了,而命令对象本身仍然是活动的。这时命令的接受者可以是在本地,也可以在网络的另外一个地址。命令对象可以在序列化之后传送到另一台服务器上去。
- 系统需要支持命令的撤销。命令对象可以把状态存储起来,等待客户端需要撤销命令所产生的效果时,可以调用 undo()方法,把命令所产生的效果撤销掉。命令对象还可以提供 redo()方法,以供客户端在需要时重新实施命令效果
- 如果要将系统中所有的数据更新到日志里,以便在系统崩溃时,可以根据日志读回所有的数据更新命令,重新调用 execute()方法一条一条执行这些命令,从而恢复系统在崩溃前所做的数据更新。
2.1.1.2 命令执行
从图中我们可以看到一共存在 4 中命令的执行方式,而 Hystrix 在执行时会根据创建的 Command 对象以及具体的情况来选择一个执行。其中 HystrixCommand 实现了下面两个执行方式
- execute():同步执行,从依赖的服务返回一个单一的结果对象,或是在发生错误的时候抛出异常
- queue():异步执行,直接返回一个 Future 对象,其中包含了服务执行结束时要返回的单一结果对象
而HystrixObservableCommand实现了另外两种执行方式:
- observe():返回 Observable 对象,它代表了操作的多个结果,它是一个 Hot Observable
- toObservable():同样会返回 Observable 对象,它代表了操作的多个结果。但它返回的是一个 Cold Observable
Observable<R> ohValue = command.observe();
Observable<R> ocValue = command.toObservable();
在 Hystrix 的底层实现中大量地使用了 RxJava。实际上 execute()、queue()也都使用了 RxJava 来实现,如下源码
    public R execute() {
        try {
            return queue().get();
        } catch (Exception e) {
            throw Exceptions.sneakyThrow(decomposeException(e));
        }
    }

    public Future<R> queue() {
        final Future<R> delegate = toObservable().toBlocking().toFuture();
        if (f.isDone()) {
            //处理立即抛出的错误
        }
        return f;
    }
- execute()是通过 queue()返回的异步对象 Future<R>的 get()方法来实现同步执行。该方法会等待任务执行结束,然后获得 R 类型的结果进行返回
- queue()则是通过 toObservable()来获得一个 Cold Observable,并且通过 toBlocking()将该 Observable 转换成 BlockingObservable,它可以把数据以阻塞的方式发射出来。而 toFuture 方法则是把 BlockingObservable 转换为一个 Future,该方法只是创建一个 Future 返回,并不会阻塞,这使得消费者可以自己决定如何处理异步操作。
2.1.1.3 结果是否被缓存
若当前命令的请求缓存功能是被启用的,并且该命令缓存命中,那么缓存的结果会立即以 Observable 对象的形式返回。
2.1.1.4 断路器是否打开
在命令结果没有缓存命中的时候,Hystrix 在执行命令前需要检查断路器是否为打开状态:
- 如果断路器是打开的,那么 Hystrix 不会执行命令,而是转接到 fallback 处理逻辑
- 如果断路器是关闭的,那么 Hystrix 跳到第 5 步,检查是否有可用资源来执行命令。
2.1.1.5 线程池/请求队列/信号量是否占满
如果与命令相关的线程池和请求队列,或者信号量已经被占满,那么 Hystrix 也不会执行命令,而是转接到 fallback 处理逻辑
2.1.1.6 HystrixObservableCommand.construct()或 HystrixCommand.run()
Hystrix 会根据我们编写的方法来决定采取什么样的方式去请求依赖服务。
HystrixCommand.run():返回一个单一的结果,或者抛出异常
HystrixObservableCommand.construct():返回一个 Observable 对象来发射多个结果,或通过 onError 发送错误通知
2.1.1.7 计算断路器的健康度
Hystrix 会将“成功”、“失败”、“拒绝”、“超时”等信息报告给断路器,而断路器会维护一组计数器来统计这些数据。
断路器会使用这些统计数据来决定是否要将断路器打开,来对某个依赖服务的请求进行“熔断/短路”,直到恢复期结束。若在恢复期结束后,根据统计数据判断如果还是未达到健康指标,就再次“熔断/短路”。
2.1.1.8 fallback 处理
当命令执行失败的时候,Hystrix 会进入 fallback 尝试回退处理,我们通常也称该操作为“服务降级”。而能够引起服务降级处理的情况有以下几种:
- 第 4 步:当前命令处于“熔断/短路”状态,断路器是打开的时候
- 第 5 步:当前命令的线程池、请求队列或者信号量被占满的时候
- 第 6 步:HystrixObservableCommand.construct()或 HystrixCommand.run()抛出异常的时候。
在服务降级逻辑中,我们需要实现一个通用的响应结果,并且该结果的处理逻辑应当是从缓存或是根据一些静态逻辑来获取,而不是依赖网络请求获取。如果一定要在降级逻辑中包含网络请求,那么该请求也必须被包装在 HystrixCommand 或是 HystrixObservableCommand 中,从而形成级联的降级策略,而最终的降级逻辑一定不是一个依赖网络请求的处理,而是一个能够稳定地返回结果的处理逻辑。
2.1.1.9 返回成功的响应
当 Hystrix 命令执行成功之后,它会将处理结果直接返回或是以 Observable 的形式返回。
2.2 断路器原理
Hystrix 有一套较为复杂的执行逻辑,大致的执行过程如下
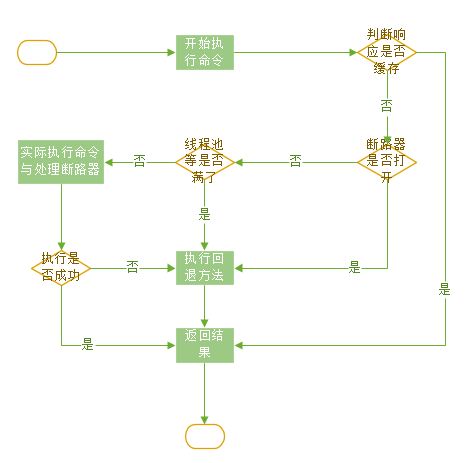
- 第一步:在命令开始执行时,会做一些准备工作,例如创建相应的线程池等
- 第二步:判断是否打开了缓存,打开了缓存就直接查找缓存并返回结果
- 第三步:判断断路器是否打开了,如果打开了,表示链路不可用,直接执行回退方法。
- 第四步:判断线程池、信号量(计数器)等条件,例如像线程池超负荷,则执行回退方法;否则,就去执行命令的内容
- 第五步:执行命令。计算是否要对断路器进行处理,执行完成后,如果满足一定条件,则需要开启断路器。如果执行成功,则返回结果,反之则执行回退。
三 Hystrix 使用详解
在“快速入门”中我们已经使用 Hystrix 中的核心注解@HystrixCommand,通过它创建了 HystrixCommand 的实现,同时利用 fallback 属性指定了服务降级的实现方法。然而这些知识 Hystrix 的一小部分,在实现一个大型分布式系统时,还需要更多高级的配置功能。
3.1 创建请求命令
Hystrix 命令就是上面所说的 HystrixCommand,它用来封装具体的依赖服务调用逻辑。
3.1.1 继承方式实现
我们可以通过继承的方式来实现,比如:
package com.bianjf.hystrix;
import java.util.Map;
import org.springframework.web.client.RestTemplate;
import com.netflix.hystrix.HystrixCommand;
public class UserCommand extends HystrixCommand<Map<String, Object>> {
    private RestTemplate restTemplate;

    private String name;
    public UserCommand(Setter setter, RestTemplate restTemplate, String name) {
         super(setter);
         this.restTemplate = restTemplate;
         this.name = name;
    }
    @SuppressWarnings("unchecked")
    @Override
    protected Map<String, Object> run() throws Exception {
         return this.restTemplate.getForObject("http://CLOUD-SYSTEM-PROVIDER/{1}/system/getData", Map.class, name);
    }
}
通过上面实现的 UserCommand,我们既可以实现请求的同步执行,也可以实现异步执行:
- 同步执行:
Map<String, Object> userMap = new UserCommand(restTemplate, "zhangsan").execute();
- 异步执行:
- Future<Map<String, Object>> userFuture = new UserCommand(restTemplate, "zhangsan").queue();
异步执行的时候,可以通过对返回的 userFuture 调用 get 方法来获取结果。get 方法为同步方法
3.1.2 注解方式实现
除了通过继承方式实现以外,还可以通过**@HystrixCommand**注解来更为优雅地实现 Hystrix 命令的定义,如下
3.1.2.1 同步执行
如下,使用注解的方式同步执行
package com.bianjf.service.impl;
import java.util.HashMap;
import java.util.Map;
import java.util.concurrent.Future;
import org.springframework.beans.factory.annotation.Autowired;
import org.springframework.stereotype.Service;
import org.springframework.web.client.RestTemplate;
import com.bianjf.service.SystemService;
import com.netflix.hystrix.contrib.javanica.annotation.HystrixCommand;
import com.netflix.hystrix.contrib.javanica.annotation.HystrixProperty;
import com.netflix.hystrix.contrib.javanica.command.AsyncResult;

@Service
public class SystemServiceImpl implements SystemService {
    @Autowired
    private RestTemplate restTemplate;

    private final String URL_SYSTEM = "http://CLOUD-SYSTEM-PROVIDER";

    /**
     * 同步请求用户服务,指定超时时间为5秒
     */
    @SuppressWarnings("unchecked")
    @HystrixCommand(commandProperties = {
            @HystrixProperty(name = "execution.isolation.thread.timeoutInMilliseconds", value = "5000"),
            @HystrixProperty(name = "execution.timeout.enabled", value = "true")
    })
    @Override
    public Map<String, Object> getUserByNameSync(String name) {
        return this.restTemplate.getForObject(this.URL_SYSTEM + "/{1}/system/getData", Map.class, name);
    }
}
3.1.2.2 异步执行
异步执行如下
package com.bianjf.service.impl;
import java.util.HashMap;
import java.util.Map;
import java.util.concurrent.Future;
import org.springframework.beans.factory.annotation.Autowired;
import org.springframework.stereotype.Service;
import org.springframework.web.client.RestTemplate;
import com.bianjf.service.SystemService;
import com.netflix.hystrix.contrib.javanica.annotation.HystrixCommand;
import com.netflix.hystrix.contrib.javanica.annotation.HystrixProperty;
import com.netflix.hystrix.contrib.javanica.command.AsyncResult;

@Service
public class SystemServiceImpl implements SystemService {
    @Autowired
    private RestTemplate restTemplate;

    private final String URL_SYSTEM = "http://CLOUD-SYSTEM-PROVIDER";

    @SuppressWarnings("unchecked")
    @HystrixCommand
    @Override
    public Future<Map<String, Object>> getUserByNameASync(final String name) {
        return new AsyncResult<Map<String, Object>>() {
            @Override
            public Map<String, Object> invoke() {
                return restTemplate.getForObject(URL_SYSTEM + "/{1}/system/getData", Map.class, name);
            }

            /**
             * 重写Get方法,用于get调用
             */
            @Override
            public Map<String, Object> get() throws UnsupportedOperationException {
                return invoke();
            }
        };
    }
}
3.1.3 定义服务降级
fallback 是 Hystrix 命令执行失败时使用的后备方法,用来实现服务的降级处理逻辑。在 HystrixCommand 中可以通过重载 getFallback()方法来实现服务降级逻辑,Hystrix 会在 run()执行过程中出现错误、超时、线程池拒绝、断路器熔断等情况时,执行 getFallback()方法内的逻辑。
3.1.3.1 继承方式实现服务降级
代码如下
package com.bianjf.hystrix;
import java.util.HashMap;
import java.util.Map;
import org.springframework.web.client.RestTemplate;
import com.netflix.hystrix.HystrixCommand;

public class UserCommand extends HystrixCommand<Map<String, Object>> {
    private RestTemplate restTemplate;

    private String name;

    protected UserCommand(Setter setter, RestTemplate restTemplate, String name) {
        super(setter);
        this.restTemplate = restTemplate;
        this.name = name;
    }

    /**
     * 具体调用的执行逻辑
     */
    @SuppressWarnings("unchecked")
    @Override
    protected Map<String, Object> run() throws Exception {
        return this.restTemplate.getForObject("http://CLOUD-SYSTEM-PROVIDER/{1}/system/getData", Map.class, name);
    }

    /**
     * 服务降级方法
     */
    @Override
    protected Map<String, Object> getFallback() {
        Map<String, Object> resultMap = new HashMap<String, Object>();
        resultMap.put("code", 1);
        resultMap.put("message", "调用用户服务失败");
        return resultMap;
    }
}
在继承 HystrixCommand 方式中,重写其 getFallback()方法即可
3.1.3.2 注解方式实现服务降级
代码如下
package com.bianjf.service.impl;
import java.util.HashMap;
import java.util.Map;
import java.util.concurrent.Future;
import org.springframework.beans.factory.annotation.Autowired;
import org.springframework.stereotype.Service;
import org.springframework.web.client.RestTemplate;
import com.bianjf.service.SystemService;
import com.netflix.hystrix.contrib.javanica.annotation.HystrixCommand;
import com.netflix.hystrix.contrib.javanica.annotation.HystrixProperty;
import com.netflix.hystrix.contrib.javanica.command.AsyncResult;

@Service
public class SystemServiceImpl implements SystemService {
    @Autowired
    private RestTemplate restTemplate;

    private final String URL_SYSTEM = "http://CLOUD-SYSTEM-PROVIDER";

    /**
     * 请求用户服务,指定降级策略,以及超时时间
     * 注意,定义fallbackMethod的时候,其参数与返回值类型要与该方法一模一样
     */
    @SuppressWarnings("unchecked")
    @HystrixCommand(fallbackMethod = "getUserByNameSyncFallback", commandProperties = {
            @HystrixProperty(name = "execution.isolation.thread.timeoutInMilliseconds", value = "5000"),
            @HystrixProperty(name = "execution.timeout.enabled", value = "true")
    })
    @Override
    public Map<String, Object> getUserByNameSync(String name) {
        return this.restTemplate.getForObject(this.URL_SYSTEM + "/{1}/system/getData", Map.class, name);
    }

    @SuppressWarnings("unchecked")
    @HystrixCommand
    @Override
    public Future<Map<String, Object>> getUserByNameASync(final String name) {
        return new AsyncResult<Map<String, Object>>() {
            @Override
            public Map<String, Object> invoke() {
                return restTemplate.getForObject(URL_SYSTEM + "/{1}/system/getData", Map.class, name);
            }

            /**
             * 重写Get方法,用于get调用
             */
            @Override
            public Map<String, Object> get() throws UnsupportedOperationException {
                return invoke();
            }
        };
    }

    /**
     * 用户服务降级
     * 注意,该方法需要与调用方法参数以及返回类型一模一样
     */
    @SuppressWarnings("unused")
    private Map<String, Object> getUserByNameSyncFallback(final String name) {
        Map<String, Object> userMap = new HashMap<String, Object>();
        userMap.put("code", 1);
        userMap.put("message", "用户服务不可用,请稍后再试");
        return userMap;
    }
}
定义一个普通的方法,该服务降级的方法需要与@HystrixCommand 修饰的方法在参数上、返回类型上一模一样,然后使用属性 fallbackMethod 指定到对应的方法即可。
3.1.4 异常处理
3.1.4.1 异常传播
在 HystrixCommand 实现的 run()方法中抛出异常时,除了HystrixBadRequestException之外,其他异常均会被 Hystrix 认为命令执行失败并触发服务降级的处理逻辑,所以当需要在命令执行中抛出不触发服务降级的异常时来使用异常传播。
使用起来非常方法,只需要通过设置@HystrixCommand 注解的 ignoreExceptions 参数,如下
@HystrixCommand(ignoreExceptions = {BadRequestException.class})
public Map<String, Object> getUserByNameSync(String name) {
    return restTemplate.getForObject("http://CLOUD-SYSTEM-PROVIDER/{1}/system/getData", Map.class, name);
}
如上,当 getUserByNameSync 方法抛出类型为 BadRequestException 的异常时,Hystrix 会将它包装在 HystrixBadRequestException 中抛出,这样就不会触发后续的 fallback 逻辑了。
3.1.4.2 异常获取
在 Hystrix 命令因为异常(除了 HystrixBadRequestException 的异常)进入服务降级逻辑之后,往往需要对不同异常做针对性的处理,除了传统的 try-catch 的实现方式之外,注解配置方式也同样可以实现异常的获取。
实现起来也非常简单,只需要在 fallback 实现方法的参数中增加 Throwable 对象的定义:
@HystrixCommand(fallbackMethod = "fallback1")
public Map<String, Object> getUserByNameSync(String name) {
    //逻辑处理
}
private Map<String, Object> fallback1(final String name, Throwable e) {
    //逻辑处理
}
3.1.5 请求缓存
当系统用户不断增长时,每个微服务需要承受的兵法压力也越来越大。在分布式环境下,通常压力来自于对依赖服务的调用,因为请求引来服务的资源需要通过通信来实现,这样的依赖方式比起进程内的调用方式会引起一部分的性能损失,同时 HTTP 相比于其他高性能的通信协议在速度上没有任何优势,所以它有类似于对数据库这样的外部资源进行读写操作,在高并发的情况下可能会成为系统的瓶颈。所以,在高并发的场景之下,Hystrix 提供了请求缓存的功能,我们可以方便的开启和使用请求缓存来优化系统,达到减轻高并发时的请求线程池消耗、降低请求响应时间的效果。
3.1.5.1 开启请求缓存功能
在 Hystrix 中,我们可以通过 HystrixRequestCache.clear()方法来进行缓存的请求,如下代码
package com.bianjf.hystrix;
import java.util.HashMap;
import java.util.Map;
import org.springframework.web.client.RestTemplate;
import com.netflix.hystrix.HystrixCommand;
import com.netflix.hystrix.HystrixCommandGroupKey;

public class UserCommand extends HystrixCommand<Map<String, Object>> {
    private RestTemplate restTemplate;

    private String name;

    protected UserCommand(RestTemplate restTemplate, String name) {
        super(Setter.withGroupKey(HystrixCommandGroupKey.Factory.asKey("UserGroup")));
        this.restTemplate = restTemplate;
        this.name = name;
    }

    /**
     * 具体调用的执行逻辑
     */
    @SuppressWarnings("unchecked")
    @Override
    protected Map<String, Object> run() throws Exception {
        return this.restTemplate.getForObject("http://CLOUD-SYSTEM-PROVIDER/{1}/system/getData", Map.class, name);
    }

    /**
     * 服务降级方法
     */
    @Override
    protected Map<String, Object> getFallback() {
        Map<String, Object> resultMap = new HashMap<String, Object>();
        resultMap.put("code", 1);
        resultMap.put("message", "调用用户服务失败");
        return resultMap;
    }

    /**
     * 开启缓存
     */
    @Override
    protected String getCacheKey() {
        return this.name;
    }
}
通过上面的例子,在 getCacheKey()方法中返回的请求缓存的 key 值,就能让该请求命令具备缓存功能。此时,当不同的外部请求处理逻辑调用了同一个依赖服务时,Hystrix 会根据 getCacheKey()方法返回的值来区分是否是重复的请求,如果他们的 cacheKey 相同,那么该依赖服务只会在第一个请求达到时被真实地调用一次,另外一个请求则是直接从请求缓存中返回结果,所以通过开启请求缓存可以让我们实现的 Hystrix 命令具备以下好处:
- 减少重复请求数,降低依赖服务的并发度
- 在同一用户的请求上下文中,相同依赖服务的返回数据始终保持一致
- 请求缓存在 run()和 construct()执行之前生效,所以可以有效减少不必要的线程开销。
3.1.5.2 清理失效缓存功能
使用请求缓存时,如果只是读操作,那么不需要考虑缓存内容是否正确的问题,但是如果请求命令中还有更新数据的写操作,那么缓存中的数据就需要我们在进行写操作的时候进行及时处理,以防止读操作的请求命令获取到了失效的数据。
在 Hystrix 中,我们可以通过 HystrixRequestCache.clear()方法来进行缓存的清理,具体如下:
package com.bianjf.hystrix;
import java.util.Map;
import org.springframework.web.client.RestTemplate;
import com.netflix.hystrix.HystrixCommand;
import com.netflix.hystrix.HystrixCommandGroupKey;
import com.netflix.hystrix.HystrixCommandKey;
import com.netflix.hystrix.HystrixRequestCache;
import com.netflix.hystrix.strategy.concurrency.HystrixConcurrencyStrategyDefault;
public class UserGetCommand extends HystrixCommand<Map<String, Object>> {
    private static final HystrixCommandKey GETTER_KEY = HystrixCommandKey.Factory.asKey("CommandKey");

    private RestTemplate restTemplate;

    private String name;

    private final String URL_SYSTEM = "http://CLOUD-SYSTEM-PROVIDER";

    public UserGetCommand(RestTemplate restTemplate, String name) {
        super(Setter.withGroupKey(HystrixCommandGroupKey.Factory.asKey("GetSetGet")));
         this.restTemplate = restTemplate;
         this.name = name;
    }

    /**
     * 请求逻辑
     */
    @SuppressWarnings("unchecked")
    @Override
    protected Map<String, Object> run() throws Exception {
         return this.restTemplate.getForObject(this.URL_SYSTEM + "/{1}/system/getData", Map.class, name);
    }

    /**
     * 开启缓存,缓存的key为name
     */
    @Override
    protected String getCacheKey() {
         return name;
    }

    /**
     * 刷新缓存
     * @param name
     */
    public static void flushCache(String name) {
         //刷新缓存,根据name进行清理
         HystrixRequestCache.getInstance(GETTER_KEY, HystrixConcurrencyStrategyDefault.getInstance()).clear(name);
    }
}
package com.bianjf.hystrix;
import java.util.Map;
import org.springframework.web.client.RestTemplate;
import com.netflix.hystrix.HystrixCommand;
import com.netflix.hystrix.HystrixCommandGroupKey;
public class UserPostCommand extends HystrixCommand<Map<String, Object>> {
    private RestTemplate restTemplate;

    private String name;

    private final String URL_SYSTEM = "http://CLOUD-SYSTEM-PROVIDER";

    public UserPostCommand(RestTemplate restTemplate, String name) {
        super(Setter.withGroupKey(HystrixCommandGroupKey.Factory.asKey("GetSetGet")));
         this.restTemplate = restTemplate;
         this.name = name;
    }
    @SuppressWarnings("unchecked")
    @Override
    protected Map<String, Object> run() throws Exception {
         //删除操作
         Map<String, Object> resultMap = this.restTemplate.getForObject(this.URL_SYSTEM + "/{1}/system/deleteUser", Map.class, name);
         //刷新缓存,缓存中失效的User
         UserGetCommand.flushCache(name);
         return resultMap;
    }
}
在该示例中,主要有两个请求命令:UserGetCommand 用于根据 name 获取 User 对象,而 UserPostCommand 用于删除 User 对象。当我们对 UserGetCommand 命令实现了请求缓存之后,那么势必需要为 UserPostCommand 命令实现缓存的清理,以保证 User 被更新之后,Hystrix 请求缓存中相同缓存 Key 的结果被移除。
3.1.6 使用注解实现请求缓存
Hystrix 的请求缓存也可以通过注解的方式进行配置实现:
| 注解 | 描述 | 属性 |
|---|---|---|
| @CacheResult | 用来标记请求命令返回的结果应该被缓存,它必须与@HystrixCommand 注解结合使用 | cacheKeyMethod |
| @CacheRemove | 该注解用来将请求命令的缓存失效,失效的缓存根据定义的 Key 决定 | commandKey,cacheKeyMethod |
| @CacheKey | 该注解用来在请求命令上标记,使其作为缓存的 Key 值,如果没有标注则会使用所有参数。如果同时还使用了@CacheResult 和@CacheRemove 注解的 cacheKeyMethod 方法指定缓存 Key 的生效,那么该注解将不会起作用. | value |
3.1.6.1 设置请求缓存
只需要添加@CacheResult 注解即可。当该依赖服务被调用并返回 Map 对象时,由于该方法被@CacheResult 注解修改,所以 Hystrix 会将该结果置入请求缓存中,而它的缓存 Key 值会使用所有的参数,也就是 String 类型的 name 值。
@CacheResult
@HystrixCommand
public Map<String, Object> getUserByNameSync(String name) {
    return this.restTemplate.getForObject("http://CLOUD-SYSTEM-PROVIDER" + "/{1}/system/getData", Map.class, name);
}
3.1.6.2 定义缓存 Key
当使用注解来定义请求缓存时,若要为请求命令指定具体的缓存 Key 生成规则,我们可以使用@CacheResult 和@CacheRemove 注解的 cacheKeyMethod 方法来指定具体的生成函数;也可以通过使用@CacheKey 注解在方法参数中指定用于组装缓存 Key 的元素。
使用 cacheKeyMethod 方法的示例如下,它通过在请求命令的同一个类中定义一个专门生成 Key 的方法,并用@CacheResult 注解的 cacheKeyMethod 方法来指定它即可。它的配置方式类似于@HystrixCommand 服务降级的 fallbackMethod 的使用。
@CacheResult(cacheKeyMethod = "getUserByNameCacheKey")
@HystrixCommand
public Map<String, Object> getUserByNameSync(String name) {
    return this.restTemplate.getForObject("http://CLOUD-SYSTEM-PROVIDER" + "/{1}/system/getData", Map.class, name);
}
/**
* 注意,在该方法中,起入参必须和主方法相同
*/
private String getUserByNameCacheKey(String name) {
    return name;
}
通过@CacheKey 注解实现的方式更加简单。但是注意:在使用@CacheKey 注解的时候,它的优先级比 cacheKeyMethod 的优先级低,如果已经使用了 cacheKeyMethod 指定缓存 Key 的生成函数,那么@CacheKey 注解不会生效。
@CacheResult
@HystrixCommand
public Map<String, Object> getUserByNameSync(@CacheKey("name") String name) {
    return this.restTemplate.getForObject("http://CLOUD-SYSTEM-PROVIDER" + "/{1}/system/getData", Map.class, name);
}
@CacheKey 注解除了可以指定方法参数作为缓存 Key 之外,它还允许访问参数对象的内部属性作为缓存 Key,如下,它指定了 User 对象的 name 属性作为缓存 Key。
@CacheResult
@HystrixCommand
public Map<String, Object> getUserByNameSync(@CacheKey("name") User user) {
    return this.restTemplate.getForObject("http://CLOUD-SYSTEM-PROVIDER" + "/{1}/system/getData", Map.class, user.getName);
}
3.1.6.3 缓存清理
在 Hystrix 的注解配置中,可以通过@CacheRemove 注解来实现失效缓存的清理,如下
@CacheResult
@HystrixCommand
public Map<String, Object> getUserByNameSync(@CacheKey("name") String name) {
    return this.restTemplate.getForObject("http://CLOUD-SYSTEM-PROVIDER" + "/{1}/system/getData", Map.class, name);
}

@CacheRemove(commandKey = "getUserByNameSync")
@HystrixCommand
public void delete(@CacheKey("name") String name) {
    this.restTemplate.getForObject(this.URL_SYSTEM + "/{1}/system/deleteUser", Map.class, name)
}
需要注意的是,@CacheRemove 注解的 commandKey 属性是必须要指定的,它用来指明需要使用请求缓存的请求命令,因为只有通过该属性的配置,Hystrix 才能找到正确的请求命令缓存位置。
3.2 属性详解
可以根据实现 HystrixCommand 的不同方式将配置分为如下两类:
当通过继承的方式实现时,可使用 Setter 对象来对请求命令的属性进行设置,比如
public HystrixCommandInstance(int id) {
                        super(Setter.withGroupKey(HystrixCommandGroupKey.Factory.asKey("ExampleGroup")).andCommandPropertiesDefaults(HystrixCommandProperties.Setter().withExecutionTimeoutInMilliseconds(500)));
    this.id = id;
}
当通过注解的方式实现时,只需要使用@HystrixCommand 中的commandProperties属性来设置,比如:
@HystrixCommand(commandKey = "helloKey", commandProperties = {@HystrixProperty(name = "execution.isolation.thread.timeoutInMilliseconds", value = "5000")})
public User getUserByNameSync(String name) {
    return this.restTemplate.getForObject("http://CLOUD-SYSTEM-PROVIDER" + "/{1}/system/getData", Map.class, name);
}
Hystrix 的配置还有很多,这些属性都存在下面 4 个不同优先级别的配置(优先级由低到高)
- 全局默认值:如果没有设置下面三个级别的属性,那么这个属性就是默认值。由于该属性通过代码定义,所以对于这个级别,主要关注它在代码中定义的默认值即可
- 全局配置属性:通过在配置文件中定义全局属性值,在应用启动时或在与 Spring Cloud Config 和 Spring Cloud Bus 实现的动态刷新配置功能配合下,可以实现对“全局默认值”的覆盖以及在运行期对“全局默认值”的动态调整
- 实例属性值:通过代码为实例定义的默认值。通过代码的方式为实例设置属性值来覆盖默认的全局配置
- 实例配置属性:通过配置文件来为指定的实例进行属性配置,以覆盖前面的三个默认值。它也可用 Spring Cloud Config 和 Spring Cloud Bus 实现的动态刷新配置功能实现对具体实例配置的动态调整
3.2.1 Command 属性
Command 属性主要用来控制 HystrixCommand 命令的行为。它主要有下面 5 种不同类型的属性配置
3.2.1.1 execution 配置
execution 配置控制的是 HystrixCommand.run()的执行。
- execution.isolation.strategy:该属性用来设置 HystrixCommand.run()执行的隔离策略,它有两个值:
- THREAD:通过线程池隔离的策略。它在独立的线程上执行,并且它的并发受线程池中线程数量的限制
- SEMAPHORE:通过信号量隔离的策略。它在调用线程上执行,并且它的并发限制受信号量计数的限制。
两种隔离策略小思考:
在实际的使用过程中,使用后面介绍的 Zuul,默认情况下会出现 ZuulException: REJECTED_SEMAPHORE_EXECUTION 的异常。因为 Zuul 默认每个路由直接用信号量做隔离,并且默认值是 100,也就是当一个路由的信号量高于 100 就拒绝服务,返回 500 或者进行熔断。
经过实际测试,使用信号量在使用的过程中,随着并发的增高,结果会出现异常熔断的情况。所以实际使用信号量会存在一定数量请求失败的情况。
我们将默认值提高,如下配置:
routes:
  authentication:
    path: /authentication/**
    service-id: AUTHENTICATION
    sensitive-headers:
    semaphore:
      maxSemaphores: 2000
routes:
  resource:
    path: /resource/**
    service-id: RESOURCE
    secsitive-headers:
    semaphore:
      maxSemaphores: 1000
使用线程隔离隔离模式,如下配置
zuul:
  ribbon-isolation-strategy: THREAD
  thread-pool:
    use-separate-thread-pools: true
    thread-pool-key-prefix: gateway
hystrix:
  command:
    default:
      execution:
        isolation:
          thread:
            timeoutInMilliseconds: 18000
  threadpool:
    default:
      coreSize: 50
      maximumSize: 100
      allowMaximumSizeToDivergeFromCoreSize: true
      maxQueueSize: -1
通过使用线程池的配置,在不达到线程数量的时候,就不会出现异常熔断的情况.
| 属性级别 | 默认值、配置方式、配置属性 |
|---|---|
| 全局默认值 | THREAD |
| 全局配置属性 | hystrix.command.default.execution.isolation.strategy |
| 实例默认值 | 通过 HystrixCommandProperties.Setter().withExecutionIsolationStrategy(ExecutionIsolationStrategy.THREAD)设置,也可以通过@HystrixProperty(name=”execution.isolation.strategy”, value=”THREAD”)注解来设置 |
| 实例配置属性 | hystrix.command.HystrixCommandKey.execution.isolation.strategy |
- execution.timeout.enabled:该属性用来配置 HystrixCommand.run()的执行是否启用超时时间。默认为 true,如果设置为 false,那么 execution.isolation.thread.timeoutInMilliseconds 属性的配置将不再起作用
| 属性级别 | 默认值、配置方式、配置属性 |
|---|---|
| 全局默认值 | true |
| 全局配置属性 | hystrix.command.default.execution.timeout.enabled |
| 实例默认值 | 通过 HystrixCommandProperties.Setter().withExecutionTimeoutEnabled (boolean value)设置,也可以通过@HystrixProperty(name=”execution.timeout.enabled”, value=”false”)注解来设置 |
| 实例配置属性 | hystrix.command.HystrixCommandKey.execution.timeout.enabled |
- execution.isolation.thread.timeoutInMilliseconds:该属性用来配置 HystrixCommand 执行的超时时间,单位为毫秒。当 HystrixCommand 执行时间超过该配置值之后,Hystrix 会将该执行命令标记为 TIMEOUT 并进入服务降级处理逻辑
| 属性级别 | 默认值、配置方式、配置属性 |
|---|---|
| 全局默认值 | 1000 毫秒 |
| 全局配置属性 | hystrix.command.default.execution.isolation.thread.timeoutInMillseconds |
| 实例默认值 | 通过 HystrixCommandProperties.Setter().withExecutionTimeoutInMilliseconds (int value)设置,也可以通过@HystrixProperty(name=”execution.isolation.thread.timeoutInMilliseconds”, value=”2000”)注解来设置 |
| 实例配置属性 | hystrix.command.HystrixCommandKey.execution.isolation.thread.timeoutInMilliseconds |
- execution.isolation.thread.interruptOnTimeout:该属性用来配置当 HystrixCommand.run()执行超时的时候是否要将它中断。
| 属性级别 | 默认值、配置方式、配置属性 |
|---|---|
| 全局默认值 | true |
| 全局配置属性 | hystrix.command.default.execution.thread.interruptOnTimeout |
| 实例默认值 | 通过 HystrixCommandProperties.Setter().withExecutionIsolationThreadInterruptOnTimeout (boolean value)设置,也可以通过@HystrixProperty(name=”execution.isolation.thread.interruptOnTimeout”, value=”false”)注解来设置 |
| 实例配置属性 | hystrix.command.HystrixCommandKey.execution.isolation.thread.interruptOnTimeout |
- execution.isolation.thread.interruptOnCancel:该属性用来配置当 HystrixCommand.run()执行被取消的时候是否要将它中断
| 属性级别 | 默认值、配置方式、配置属性 |
|---|---|
| 全局默认值 | true |
| 全局配置属性 | hystrix.command.default.execution.thread.interruptOnCancel |
| 实例默认值 | 通过 HystrixCommandProperties.Setter().withExecutionIsolationThreadInterruptOnCancel (boolean value)设置,也可以通过@HystrixProperty(name=”execution.isolation.thread.interruptOnCancel”, value=”false”)注解来设置 |
| 实例配置属性 | hystrix.command.HystrixCommandKey.execution.isolation.thread.interruptOnCancel |
- execution.isolation.semaphore.maxConcurrentRequests:当 HystrixCommand 的隔离策略使用信号量的时候,该属性用来配置信号量的大小(并发请求数)。当最大并发请求数达到该设置值时,后续的请求将会被拒绝
| 属性级别 | 默认值、配置方式、配置属性 |
|---|---|
| 全局默认值 | 10 |
| 全局配置属性 | hystrix.command.default.execution.isolation.semaphore.maxConcurrentRequests |
| 实例默认值 | 通过 HystrixCommandProperties.Setter().withExecutionIsolationSemaphoreMaxConcurrentRequests (int value)设置,也可以通过@HystrixProperty(name=”execution.isolation.semaphore.maxConcurrentRequests”, value=”20”)注解来设置 |
| 实例配置属性 | hystrix.command.HystrixCommandKey.execution.isolation.semaphore.maxConcurrentRequests |
3.2.1.2 fallback 配置
下面这些属性用来控制 HystrixCommand.getFallback()的执行,这些属性同时适用于线程池的信号量的隔离策略。
- fallback.isolation.semaphore.maxConcurrentRequests:该属性用来设置从调用线程中允许 HystrixCommand.getFallback()方法执行的最大并发请求数。当达到最大并发请求数时,后续的请求将会被拒绝并抛出异常(因为它没有后续的 fallback 可以被调用了)
| 属性级别 | 默认值、配置方式、配置属性 |
|---|---|
| 全局默认值 | 10 |
| 全局配置属性 | hystrix.command.default.fallback.isolation.semaphore.maxConcurrentRequests |
| 实例默认值 | 通过 HystrixCommandProperties.Setter().withFallbackIsolationSemaphoreMaxConcurrentRequests (int value)设置,也可以通过@HystrixProperty(name=”execution.fallback.isolation.semaphore.maxConcurrentRequests”, value=”20”)注解来设置 |
| 实例配置属性 | hystrix.command.HystrixCommandKey.execution.isolation.semaphore.maxConcurrentRequests |
- fallback.enabled:该属性用来设置降级策略是否启用,如果设置为 false,那么当请求失败或者拒绝发生时,将不会调用 HystrixCommand.getFallback()来执行服务降级逻辑
| 属性级别 | 默认值、配置方式、配置属性 |
|---|---|
| 全局默认值 | true |
| 全局配置属性 | hystrix.command.default.fallback.enabled |
| 实例默认值 | 通过 HystrixCommandProperties.Setter().withFallbackEnabled (boolean value)设置,也可以通过@HystrixProperty(name=” fallback.enabled”, value=”false”)注解来设置 |
| 实例配置属性 | hystrix.command.HystrixCommandKey.fallback.enabled |
3.2.1.3 circuitBreaker 配置
下面这些事断路器的属性配置,用来控制 HystrixcCircuitBreaker 的行为。
- circuitBreaker.enabled:该属性用来确定当服务请求命令失败时,是否使用断路器来跟踪其健康指标和熔断请求
| 属性级别 | 默认值、配置方式、配置属性 |
|---|---|
| 全局默认值 | true |
| 全局配置属性 | hystrix.command.default.circuitBreaker.enabled |
| 实例默认值 | 通过 HystrixCommandProperties.Setter().withCircuitBreakerEnabled (boolean value)设置,也可以通过@HystrixProperty(name=”circuitBreaker.enabled”, value=”true”)注解来设置 |
| 实例配置属性 | hystrix.command.HystrixCommandKey.circuitBreaker.enabled |
- circuitBreaker.requestVolumeThreshold:该属性用来设置在滚动时间窗中,断路器熔断的最小请求数。例如,默认该值为 20 的时候,如果滚动时间窗(默认为 10 秒)内收到了 19 个请求,即使这 19 个请求都失败了,断路器也不会打开。
| 属性级别 | 默认值、配置方式、配置属性 |
|---|---|
| 全局默认值 | 20 |
| 全局配置属性 | hystrix.command.default.circuitBreaker.requestVolumeThreshold |
| 实例默认值 | 通过 HystrixCommandProperties.Setter().withCircuitBreakerRequestVolumeThreshold (int value)设置,也可以通过@HystrixProperty(name=”circuitBreaker.requestVolumeThreshold”, value=”30”)注解来设置 |
| 实例配置属性 | hystrix.command.HystrixCommandKey.circuitBreaker.requestVolumeThreshold |
- circuitBreaker.sleepWindowInMilliseconds:该属性用来设置当断路器打开之后的休眠时间窗。休眠时间窗结束之后,会将断路器置为“半开”状态,尝试熔断的请求命令,如果依然失败就将断路器继续设置为“打开”状态,如果成功就设置为“关闭”状态
| 属性级别 | 默认值、配置方式、配置属性 |
|---|---|
| 全局默认值 | 5000 |
| 全局配置属性 | hystrix.command.default.circuitBreaker.sleepWindowInMilliseconds |
| 实例默认值 | 通过 HystrixCommandProperties.Setter().withCircuitBreakerSleepWindowInMilliseconds (int value)设置,也可以通过@HystrixProperty(name=”circuitBreaker.sleepWindowInMilliseconds”, value=”3000”)注解来设置 |
| 实例配置属性 | hystrix.command.HystrixCommandKey.circuitBreaker.sleepWindowInMilliseconds |
- circuitBreaker.errorThresholdPercentage:该属性用来设置断路器打开的错误百分比条件。例如,默认值为 5000 的情况下,表示在滚动时间窗中,在请求数量超过 circuitBreaker.requestVolumeThreshold 阈值的前提下,如果错误请求书的百分比超过 50,就把断路器设置为“打开”状态,否则就设置为“关闭”状态
| 属性级别 | 默认值、配置方式、配置属性 |
|---|---|
| 全局默认值 | 50 |
| 全局配置属性 | hystrix.command.default.circuitBreaker.errorThresholdPercentage |
| 实例默认值 | 通过 HystrixCommandProperties.Setter().withCircuitBreakerErrorThresholdPercentage (int value)设置,也可以通过@HystrixProperty(name=”circuitBreaker.errorThresholdPercentage”, value=”40”)注解来设置 |
| 实例配置属性 | hystrix.command.HystrixCommandKey.circuitBreaker.errorThresholdPercentage |
- circuitBreaker.forceOpen:如果该属性设置为 true,断路器将强制进入“打开”状态,它会拒绝所有请求。该属性优先于 circuitBreaker.forceClosed 属性
| 属性级别 | 默认值、配置方式、配置属性 |
|---|---|
| 全局默认值 | false |
| 全局配置属性 | hystrix.command.default.circuitBreaker.forceOpen |
| 实例默认值 | 通过 HystrixCommandProperties.Setter().withCircuitBreakerForceOpen (boolean value)设置,也可以通过@HystrixProperty(name=”circuitBreaker.forceOpen”, value=”true”)注解来设置 |
| 实例配置属性 | hystrix.command.HystrixCommandKey.circuitBreaker.forceOpen |
- circuitBreaker.forceClosed:如果该属性设置为 true,断路器将强制进入“关闭”状态,它会接收所有请求。如果 circuitBreaker.forceOpen 属性为 true,该属性不会生效。
| 属性级别 | 默认值、配置方式、配置属性 |
|---|---|
| 全局默认值 | false |
| 全局配置属性 | hystrix.command.default.circuitBreaker.forceClosed |
| 实例默认值 | 通过 HystrixCommandProperties.Setter().withCircuitBreakerForceClosed (boolean value)设置,也可以通过@HystrixProperty(name=”circuitBreaker.forceClosed”, value=”true”)注解来设置 |
| 实例配置属性 | hystrix.command.HystrixCommandKey.circuitBreaker.forceClosed |
3.2.1.4 metrics 配置
下面的属性均与 HystrixCommand 和 HystrixObservableCommand 执行中捕获的指标信息有关
- metrics.rollingStats.timeInMilliseconds:该属性用来设置滚动时间窗的长度,单位为毫秒。该事件用于断路器判断健康度时需要收集信息的持续时间。断路器在收集指标信息的时候回根据设置的时间窗长度拆分成多个“桶”来累计各度量值,每个“桶”记录了一段时间内的采集指标。例如,当采用默认值 10000 毫秒时,断路器默认将其拆分成 10 个桶(桶的数量也可以通过 metrics.rollingStatus.numBuckets 参数设置),每个桶记录 1000 毫秒内的指标信息
| 属性级别 | 默认值、配置方式、配置属性 |
|---|---|
| 全局默认值 | 10000 |
| 全局配置属性 | hystrix.command.default.metrics.rollingStats.timeInMilliseconds |
| 实例默认值 | 通过HystrixCommandProperties.Setter().withMetricsRollingStatisticalWindowInMilliseconds (int value)设置,也可以通过@HystrixProperty(name=”metrics.rollingStats.timeInMilliseconds”, value=”20000”)注解来设置 |
| 实例配置属性 | hystrix.command.HystrixCommandKey.metrics.rollingStats.timeInMilliseconds |
- metrics.rollingStats.numBuckets:该属性用来设置滚动时间窗统计指标信息时划分“桶”的数量
| 属性级别 | 默认值、配置方式、配置属性 |
|---|---|
| 全局默认值 | 10 |
| 全局配置属性 | hystrix.command.default.metrics.rollingStats.numBuckets |
| 实例默认值 | 通过HystrixCommandProperties.Setter().withMetricsRollingStatisticalWindowBuckets (int value)设置,也可以通过@HystrixProperty(name=”metrics.rollingStats.numBuckets”, value=”20”)注解来设置 |
| 实例配置属性 | hystrix.command.HystrixCommandKey.metrics.rollingStats.numBuckets |
注意:metrics.rollingStats.timeInMilliseconds 参数的设置必须能被 metrics.rollingStats.numBuckets 参数整除,不然将抛出异常。
- metrics.rollingPercentile.enabled:该属性用来设置对命令执行的延迟是否使用百分位数来跟踪和计算。如果设置为 false,那么所有的概要统计都将返回-1
| 属性级别 | 默认值、配置方式、配置属性 |
|---|---|
| 全局默认值 | true |
| 全局配置属性 | hystrix.command.default.metrics.rollingPercentile.enabled |
| 实例默认值 | 通过HystrixCommandProperties.Setter().withMetricsRollingPercentileEnabled (boolean value)设置,也可以通过@HystrixProperty(name=”metrics.rollingPercentile.enabled”, value=”false”)注解来设置 |
| 实例配置属性 | hystrix.command.HystrixCommandKey.metrics.rollingPercentile.enabled |
- metrics.rollingPercentile.timeInMilliseconds:该属性用来设置百分位统计的滚动窗口的持续事件,单位为毫秒
| 属性级别 | 默认值、配置方式、配置属性 |
|---|---|
| 全局默认值 | 60000 |
| 全局配置属性 | hystrix.command.default.metrics.rollingPercentile.timeInMilliseconds |
| 实例默认值 | 通过HystrixCommandProperties.Setter().withMetricsRollingPercentileWindowInMilliseconds (int value)设置,也可以通过@HystrixProperty(name=”metrics.rollingPercentile.timeInMilliseconds”, value=”50000”)注解来设置 |
| 实例配置属性 | hystrix.command.HystrixCommandKey.metrics.rollingPercentile.timeInMilliseconds |
- metrics.rollingPercentile.numBuckets:该舒勇用来设置百分位统计滚动窗口中使用“桶”的数量
| 属性级别 | 默认值、配置方式、配置属性 |
|---|---|
| 全局默认值 | 6 |
| 全局配置属性 | hystrix.command.default.metrics.rollingPercentile.numBuckets |
| 实例默认值 | 通过HystrixCommandProperties.Setter().withMetricsRollingPercentileWindowBuckets (int value)设置,也可以通过@HystrixProperty(name=”metrics.rollingPercentile.numBuckets”, value=”5”)注解来设置 |
| 实例配置属性 | hystrix.command.HystrixCommandKey.metrics.rollingPercentile.numBuckets |
注意:metrics.rollingPercentile.timeInMilliseconds 参数的设置必须能够被 metrics.rollingPercentile.numBuckets 参数整除,不然将会抛出异常
- metrics.rollingPercentile.bucketSize:该舒勇用来设置在执行过程中每个“桶”中保留的最大执行次数。如果在该滚动时间窗内发生超过该设定值得执行次数,就从最初的位置开始重写。例如,将该值设置为 100,滚动窗口为 10 秒,若在 10 秒内一个“桶”中发生了 500 次执行,那么该“桶”中只保留最后的 100 次执行的统计。另外,增加该值的大小将会增加内存量的消耗,并增加排序百分位数所需的计算时间
| 属性级别 | 默认值、配置方式、配置属性 |
|---|---|
| 全局默认值 | 100 |
| 全局配置属性 | hystrix.command.default.metrics.rollingPercentile.bucketSize |
| 实例默认值 | 通过HystrixCommandProperties.Setter().withMetricsRollingPercentileBuckets (int value)设置,也可以通过@HystrixProperty(name=”metrics.rollingPercentile.bucketSize”, value=”120”)注解来设置 |
| 实例配置属性 | hystrix.command.HystrixCommandKey.metrics.rollingPercentile.bucketSize |
- metrics.healthSnapshot.intervalInMilliseconds:该属性用来设置采集影响断路器状态的健康快照(请求的成功、错误百分比)的间隔等待时间
| 属性级别 | 默认值、配置方式、配置属性 |
|---|---|
| 全局默认值 | 500 |
| 全局配置属性 | hystrix.command.default.metrics.healthSnapshot.intervalInMilliseconds |
| 实例默认值 | 通过HystrixCommandProperties.Setter().withMetricsHealthSnapshotIntervalInMilliseconds (int value)设置,也可以通过@HystrixProperty(name=”metrics.healthSnapshot.intervalInMilliseconds”, value=”600”)注解来设置 |
| 实例配置属性 | hystrix.command.HystrixCommandKey.metrics.healthSnapshot.intervalInMilliseconds |
3.2.1.5 requestContext 配置
下面这些属性涉及 HystrixCOmmand 使用的 HystrixRequestContext 的设置。
- requestCache.enabled:该属性用来配置是否开启请求缓存
| 属性级别 | 默认值、配置方式、配置属性 |
|---|---|
| 全局默认值 | true |
| 全局配置属性 | hystrix.command.default.requestCache.enabled |
| 实例默认值 | 通过HystrixCommandProperties.Setter().withRequestCacheEnabled (boolean value)设置,也可以通过@HystrixProperty(name=”requestCache.enabled”, value=”false”)注解来设置 |
| 实例配置属性 | hystrix.command.HystrixCommandKey.requestCache.enabled |
- requestLog.enabled:该属性用来设置 HystrixCommand 的执行和事件是否打印日志到 HystrixRequestLog 中
| 属性级别 | 默认值、配置方式、配置属性 |
|---|---|
| 全局默认值 | true |
| 全局配置属性 | hystrix.command.default.requestLog.enabled |
| 实例默认值 | 通过HystrixCommandProperties.Setter().withRequestLogEnabled (boolean value)设置,也可以通过@HystrixProperty(name=”requestLog.enabled”, value=”false”)注解来设置 |
| 实例配置属性 | hystrix.command.HystrixCommandKey.requestLog.enabled |
3.2.2 threadPool 属性
该属性除了在代码中用 set 和配置文件配置之外,还可使用注解进行配置。可使用@HystrixCommand 中的 threadPoolProperties 属性来设置。比如
@HystrixCommand(fallbackMethod = "helloFallback", commandKey = "helloKey", threadPoolProperties = {@HystrixProperty(name = "coreSize", value = "20")})
下面这些属性用来控制 Hystrix 命令所属线程池的配置。
- coreSize:该参数用来设置执行命令线程池的核心线程数,该值也就是命令执行的最大并发量
| 属性级别 | 默认值、配置方式、配置属性 |
|---|---|
| 全局默认值 | 10 |
| 全局配置属性 | hystrix.threadpool.default.coreSize |
| 实例默认值 | 通过HystrixThreadPoolProperties.Setter.withCoreSize(int value)设置,也可以通过@HystrixProperty(name=”coreSize”, value=”20”)注解来设置 |
| 实例配置属性 | hystrix.threadpool.HystrixThreadPoolKey.coreSize |
- maximumSize:该参数设置最大线程池大小。即最大执行命令线程池的核心线程数。此设置仅在设置了 allowMaximumSizeToDivergeFromCoreSize 时才会生效
| 属性级别 | 默认值、配置方式、配置属性 |
|---|---|
| 全局默认值 | 10 |
| 全局配置属性 | hystrix.threadpool.default.maximumSize |
| 实例默认值 | 通过HystrixThreadPoolProperties.Setter.withCoreSize(int value)设置,也可以通过@HystrixProperty(name=”maximumSize”, value=”20”)注解来设置 |
| 实例配置属性 | hystrix.threadpool.HystrixThreadPoolKey.maximumSize |
- maxQueueSize:该参数用来设置线程池的最大队列大小。当设置为-1 时,线程池将使用 SynchronousQueue 实现的队列,否则将使用 LinkedBlockingQueue 实现的队列
| 属性级别 | 默认值、配置方式、配置属性 |
|---|---|
| 全局默认值 | -1 |
| 全局配置属性 | hystrix.threadpool.default.maxQueueSize |
| 实例默认值 | 通过HystrixThreadPoolProperties.Setter.withMaxQueueSize(int value)设置,也可以通过@HystrixProperty(name=”maxQueueSize”, value=”10”)注解来设置 |
| 实例配置属性 | hystrix.threadpool.HystrixThreadPoolKey.naxQueueSize |
- queueSizeRejectionThreshold:该参数用来为队列设置拒绝阈值。通过该参数,即使队列没有达到最大值也能拒绝请求。该参数主要是对 LinkedBlockingQueue 队列的补充,因为 LinkedBlockingQueue 队列不能动态修改它的对象大小,而通过该属性就可以调整拒绝请求的队列大小了。
| 属性级别 | 默认值、配置方式、配置属性 |
|---|---|
| 全局默认值 | 5 |
| 全局配置属性 | hystrix.threadpool.default.queueSizeRejectionThreshold |
| 实例默认值 | 通过HystrixThreadPoolProperties.Setter.withQueueSizeRejectionThreshold(int value)设置,也可以通过@HystrixProperty(name=”queueSizeRejectionThreshold”, value=”10”)注解来设置 |
| 实例配置属性 | hystrix.threadpool.HystrixThreadPoolKey.queueSizeRejectionThreshold |
注意:当 maxQueueSize 属性为-1 时,该属性不会生效。
- allowMaximumSizeToDivergeFromCoreSize:此属性允许 maximumSize 的配置生效
| 属性级别 | 默认值、配置方式、配置属性 |
|---|---|
| 全局默认值 | false |
| 全局配置属性 | hystrix.threadpool.default.allowMaximumSizeToDivergeFromCoreSize |
| 实例默认值 | 通过HystrixThreadPoolProperties.Setter.withQueueSizeRejectionThreshold(boolean value)设置,也可以通过@HystrixProperty(name=”allowMaximumSizeToDivergeFromCoreSize”, value=”true”)注解来设置 |
| 实例配置属性 | hystrix.threadpool.HystrixThreadPoolKey.allowMaximumSizeToDivergeFromCoreSize |


评论区