


一 Spring Cloud Gateway入门
1.1 Spring Cloud Gateway简介
Zuul基于Servlet,使用阻塞API,它不支持任何长连接,如WebSockets,而Spring Cloud Gateway使用非阻塞API,支持WebSockets,支持限流等新特性。
Spring Cloud Gateway是Spring Cloud的一个全新项目,该项目是基于Spring 5.0,Spring Boot 2.0和Project Reactor等技术开发的网关,它旨在微服务架构提供一种简单有效的统一API路由管理方式。
1.1.1 执行流程
- Route(路由):这是网关的基本构建块,它由一个ID,一个目标URI,一组断言和一组过滤器定义。如果断言为真,则路由匹配。
- Predicate(断言):这是一个Java 8的Predicate,输入类型是一个ServerWebExchange。可以使用它来匹配来自HTTP请求的任何内容,例如headers或参数
- Filter(过滤器):这是GatewayFilter的实例,我们可以使用它修改请求和响应。
Spring Cloud Gateway的执行流程如下图所示:
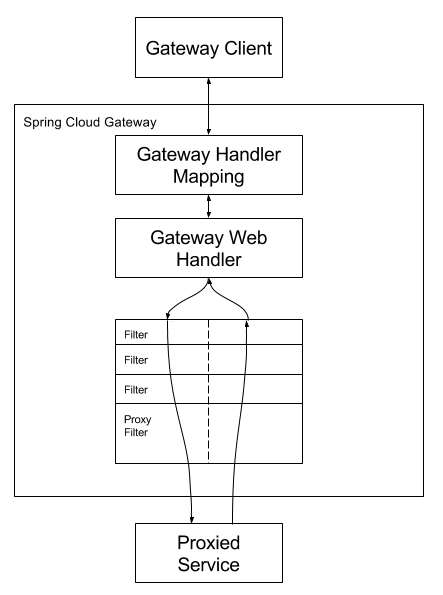
客户端向Spring Cloud Gateway发出请求,如果Gateway Handler Mapping中找到与请求相匹配的路由,将其发送到Gateway Web Handler。Handler再通过指定的过滤器链来讲请求发送到实际的服务执行业务逻辑,然后返回。
1.2 Spring Cloud 快速开始
Spring Cloud Gateway网关路由有两种配置方式:
- 在配置文件yml中配置。建议使用yml方式配置
- 通过@Bean自定义RouteLocator
我这里使用Spring Cloud Hoxton版本,依赖如下:
<parent>
    <groupId>org.springframework.boot</groupId>
    <artifactId>spring-boot-starter-parent</artifactId>
    <version>2.3.4.RELEASE</version>
    <relativePath/>
</parent>

<dependencyManagement>
    <dependencies>
        <!-- Spring-Cloud Start -->
        <dependency>
            <groupId>org.springframework.cloud</groupId>
            <artifactId>spring-cloud-dependencies</artifactId>
            <version>Hoxton.RELEASE</version>
            <type>pom</type>
            <scope>import</scope>
        </dependency>
        <!-- Spring-Cloud End -->
    </dependencies>
</dependencyManagement>
添加项目依赖包:
<dependency>
    <groupId>org.springframework.cloud</groupId>
    <artifactId>spring-cloud-starter-gateway</artifactId>
</dependency>
Spring Cloud Gateway是使用Netty + WebFlux实现,因此不需要再引入Web模块。
先设置配置文件如下:
server:
  port: 9100
spring:
  application:
    name: biz-gateway-service
  main:
    allow-bean-definition-overriding: true
  cloud:
    gateway:
      routes:
        - id: business-api-service
          uri: http://192.168.10.79:9097
          predicates:
            - Path=/v1/public/api/get/domain/info
各字段含义如下:
- id:自定义的路由ID,保持唯一即可
- uri:目标服务器地址
- predicates:路由条件。Predicate接收一个输入参数,返回一个布尔结果。该接口包含多种默认方法来将Predicate组合成其他复杂的逻辑
- filters:过滤规则,本示例暂时没使用
上面这段的配置,配置了一个ID为business-api-server的路由规则,当访问http://127.0.0.1:9100/v1/public/api/get/domain/info 时会自动转发到地址:http://192.168.10.79:9097/v1/public/api/get/domain/info 。配置完成启动项目即可测试。具体的后台服务我这里不做展示。
转发功能同样可以通过代码来实现,如下,使用@Bean配置:
/**
* 路由配置
* @param builder 路由构造器
* @return 路由配置
*/
@Bean
public RouteLocator routeLocator(RouteLocatorBuilder builder) {
    return builder.routes()
            .route("ipAddrId", r -> r.path("/v1/public/api/get/ip/addr").uri("http://192.168.10.79:9097"))
            .build();
}
上面配置一个ID为ipAddrId的路由,当访问http://127.0.0.1:9100/v1/public/api/get/ip/addr 时会自动转发到地址http://192.168.10.79:9097/v/1public/api/get/ip/addr 上,和上面配置文件转发效果一样。
1.3 路由规则
Spring Cloud Gateway的功能很强大,是通过Spring WebFlux的HandlerMapping作为底层支持来匹配到转发路由,Spring Cloud Gateway内置了很多Predicates工厂,这些Predicates工厂通过不同的HTTP请求参数来匹配,多个Predicates工厂可以组合使用。
1.3.1 Predicate介绍
Predicate是源于Java 8,是Java8中引入的一个函数,Predicate接收一个输入参数,返回一个布尔值结果。在Spring Cloud Gateway中Spring利用Predicate特性实现了各种路由匹配规则,有用过Header、请求参数等不同条件来进行条件匹配到对应的路由。如下,是Spring Cloud Gateway内置的几种Predicate的实现:
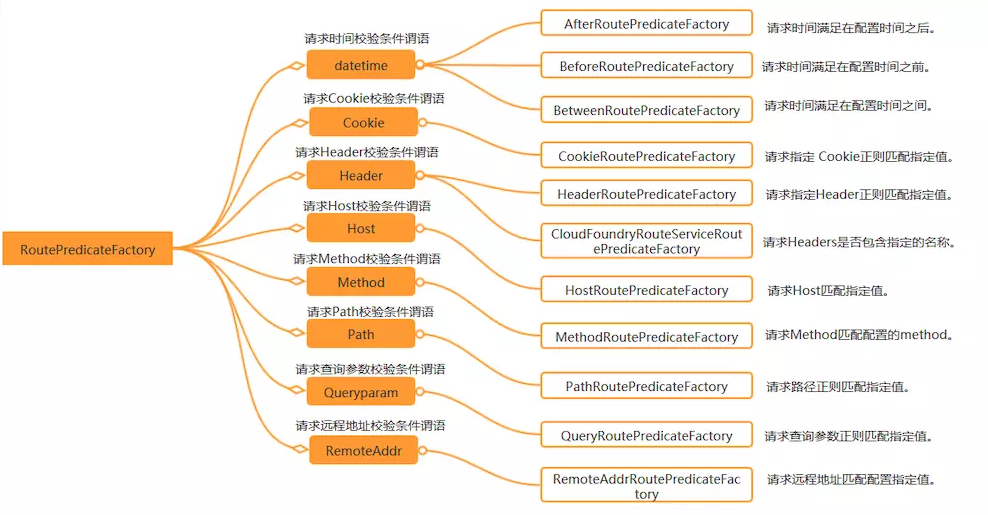
其实就是Predicate的一组匹配规则,方便让请求来找到对应的Route进行处理。
1.3.1.1 通过时间匹配
Predicate支持设置一个时间,在请求进行转发的时候,可以通过判断在这个时间之前或者之后进行转发。比如我这里现在设置只有在2020-12-19之后才会转发到www.shangsw.com 上,在这之前不进行转发。可以这样配置:
spring:
  cloud:
    gateway:
      routes:
        - id: time_route
          uri: http://www.shangsw.com
          predicates:
            - After=2020-12-19T06:06:06+08:00[Asia/Shanghai]
Spring是通过ZonedDateTime来对时间进行的比对。ZonedDateTime用于表示带时区的日期与时间信息的类,中国的时区:Asia/Shanghai。
After Route Predicate是指在这个时间之后的请求都转发到目标地址。上面的配置当访问:http://localhost:9100 时会自动转发到 http://www.shangsw.com
Before Route Predicate与After相反,是在某个时间之前的请求都进行转发,只需要将关键字After换成Before即可。
除了在时间之前或者之后外,Gateway还支持限制路由请求在某一个时间段范围内,可以使用Between Route Predicate来实现,如下:
server:
  port: 9100
spring:
  cloud:
    gateway:
      routes:
        - id: time_between
          uri: http://www.shangsw.com
          predicates:
            - Between=2020-12-19T06:06:06+08:00[Asia/Shanghai], 2020-12-21T06:06:06+08:00[Asia/Shanghai]
这样设置就以为这在这个时间段内可以匹配到此路由,超过这个时间段范围就不会进行匹配。通过时间匹配路由的功能,可以在限时抢购中运用。
1.3.1.2 通过Cookie匹配
Cookie Route Predicate可以接收两个参数,一个是Cookie name,一个是正则表达式,路由规则会通过获取对应的Cookie name值和正则表达式去匹配,如果匹配上就会执行路由,否则不执行。
如下配置:
server:
  port: 9100
spring:
  cloud:
    gateway:
      routes:
        - id: cookie_route
          uri: http://www.shangsw.com
          predicates:
            - Cookie=company, bianjf
这样在Cookie中添加companyId=bianjf即可匹配;否则会报404错误。具体可通过PostMan或者curl进行模拟,我在这不做演示。
1.3.1.3 通过Header匹配
Header Route Predicate和Cookie Route Predicate一样,也是接收两个参数,一个header中属性名称和一个正则表达式。这个属性值和正则表大会上匹配则执行。
如下示例:
server:
  port: 9100
spring:
  cloud:
    gateway:
      routes:
        - id: header_route
          uri: http://www.shangsw.com
          predicates:
            - Header=X-Request-Id, \d+
在header中添加X-Request-Id,后面如果跟的是数字,则可以访问。如果改为字符串或者,则会报404错误。
1.3.1.4 通过Host匹配
Host Route Predicate接收一组参数,一组匹配的域名列表,这个模板是一个ant分隔的模板,用“.”号作为分隔符,它通过参数中的主机地址作为匹配规则。
如下示例:
server:
  port: 9100
spring:
  cloud:
    gateway:
      routes:
        - id: host_route
          uri: http://www.shangsw.com
          predicates:
            - Host=**.shangsw.com
在host中必须携带shangsw.com才可以访问,否则无法匹配,出现404错误。
1.3.1.5 通过请求方式匹配
可以通过是POST、GET、PUT、DELETE等不同的请求方式来进行路由,如下:
server:
  port: 9100
spring:
  cloud:
    gateway:
      routes:
        - id: method_route
          uri: http://www.shangsw.com
          predicates:
            - Method=GET
通过GET方式则进行路由匹配转发,否则报404错误。
1.3.1.6 通过请求路径匹配
Path Route Predicate接收一个匹配路径的参数来判断是否走路由。
如下:
server:
  port: 9100
spring:
  cloud:
    gateway:
      routes:
        - id: path_route
          uri: http://192.168.10.79:9097
          predicates:
            - Path=/business/**
请求/business/的任何内容都可以匹配。如果不是这个路径则404错误。
1.3.1.7 通过请求参数匹配
Query Route Predicate支持传入两个参数,一个是属性名一个作为属性值。属性值可以是正则表达式,也可以是空。如下
server:
  port: 9100
spring:
  cloud:
    gateway:
      routes:
        - id: query_route
          uri: http://www.shangsw.com
          predicates:
            - Query=business
这样配置之后,只要在请求参数上添加business即可,有没有值都可以匹配。但是没有business则会报404错误。
也可以进行如下配置,business必须为123456才可以匹配,否则不进行匹配:
server:
  port: 9100
spring:
  cloud:
    gateway:
      routes:
        - id: query_route
          uri: http://www.shangsw.com
          predicates:
            - Query=business,123456
1.3.1.8 通过请求IP地址匹配
Predicate也支持通过设置某个ip区间号段的请求才会路由,RemoteAddr Route Predicate接收cidr符号(IPv4或IPv6),例如192.168.10.0/24
如下:
server:
  port: 9100
spring:
  cloud:
    gateway:
      routes:
        - id: remote_addr_route
          uri: http://www.shangsw.com
          predicates:
            - RemoteAddr=192.168.10.0/24
也可以进行综合使用。当各种Predicates同时存在同一个路由时,请求必须同时满足所有的条件才会被这个路由匹配。
二 Spring Cloud Gateway
2.1 环境准备
在实际的工作中,服务的相互调用都是依赖于服务中心提供的入口来使用。Spring Cloud Gateway提供了一种默认转发的能力,主要将Spring Cloud Gateway注册到服务中心,Spring Cloud Gateway默认就会代理服务中心的所有服务。
我这里使用阿里的Nacos作为服务注册和配置中心。具体的Nacos搭建和使用的过程就不做演示了,可以看: 4、Nacos + Spring Cloud
引入依赖如下:
<dependencyManagement>
    <dependencies>
        <!-- Spring-Cloud Start -->
        <dependency>
            <groupId>org.springframework.cloud</groupId>
            <artifactId>spring-cloud-dependencies</artifactId>
            <version>Hoxton.RELEASE</version>
            <type>pom</type>
            <scope>import</scope>
        </dependency>
        <dependency>
            <groupId>com.alibaba.cloud</groupId>
            <artifactId>spring-cloud-alibaba-dependencies</artifactId>
            <version>2.2.3.RELEASE</version>
            <type>pom</type>
            <scope>import</scope>
        </dependency>
        <!-- Spring-Cloud End -->
    </dependencies>
</dependencyManagement>
使用阿里的Spring Cloud作为基础依赖。
引入Nacos如下:
<dependency>
    <groupId>com.alibaba.cloud</groupId>
    <artifactId>spring-cloud-starter-alibaba-nacos-discovery</artifactId>
</dependency>
<dependency>
    <groupId>com.alibaba.cloud</groupId>
    <artifactId>spring-cloud-starter-alibaba-nacos-config</artifactId>
</dependency>
然后引入网关:
<dependency>
    <groupId>org.springframework.cloud</groupId>
    <artifactId>spring-cloud-starter-gateway</artifactId>
</dependency>
配置文件如下:
server:
  port: 9100
spring:
  application:
    name: biz-gateway-service
  main:
    allow-bean-definition-overriding: true
  cloud:
    nacos:
      discovery:
        server-addr: 192.168.10.3:8849
        namespace: c5d2c515-9e06-4c31-b6d1-31102959cad4
        username: nacos
        password: nacos
        ip: 192.168.10.79
      config:
        server-addr: 192.168.10.3:8849
        file-extension: yml
        group: dev
        namespace: c5d2c515-9e06-4c31-b6d1-31102959cad4
        username: nacos
        password: nacos
    gateway:
      discovery:
        locator:
          enabled: true
- spring.cloud.gateway.discovert.locator.enable:是否与服务注册与发现组件进行结合,通过serviceId转发到具体的服务实例。默认为false,设置为true便可开启通过服务注册中心自动根据serviceId创建路由的功能
需要在启动类进行开启服务注册发现注解:@EnableDiscoveryClient
访问的语法如下:
http://网关地址:端口/serviceId/具体的URL
例如,我后台有一个服务是business-api-service服务,访问这个服务上的接口可以为:
http://192.168.10.79:9100/business-api-service/v1/public/api/get/ip/addr
并且Spring Cloud Gateway具有服务的负载功能。
2.2 基于Filter实现的功能
Spring Cloud Gateway的Filter的声明周期只有两个:“pre”和“post”:
- PRE:这种过滤器在请求被路由之前调用。可以使用这种过滤器实现身份验证、在集群中选择请求的微服务、记录调试信息等
- POST:这种过滤器在路由到微服务以后执行。可以为响应头添加标准的HTTP Header、收集统计信息和指标、将响应从微服务发送给客户端等。
Spring Cloud Gateway的Filter从作用范围可分为两种:GatewayFilter与GlobalFilter。
- GatewayFilter:应用到单个路由或者一个分组的路由上
- GlobalFilter:应用到所有的路由上
2.2.1 GatewayFilter
过滤器允许以某种方式修改传入的HTTP请求或传出的HTTP响应。过滤器的作用域为特定的路由。Spring Cloud Gateway包含很多内置的GatewayFilter工厂:
| 过滤器 | 功能描述 |
|---|---|
| AddRequestHeaderGatewayFilterFactory | 添加请求头的过滤器工厂 |
| AddRequestParameterGatewayFilterFactory | 添加请求参数的过滤器工厂 |
| AddResponseHeaderGatewayFilterFactory | 添加响应头的过滤器工厂 |
| HystrixGatewayFilterFacotry | Hystrix的过滤器工厂 |
| PrefixPathGatewayFilterFactory | PrefixPath过滤器工厂 |
| PreserveHostHeaderGatewayFilterFactory | 保留原请求头的过滤器工厂 |
| RequestRateLimiterGatewayFilterFactory | 请求限流头的过滤器工厂 |
| RedirectToGatewayFilterFactory | 重定向的过滤器工厂 |
| RemoveNonProxyHeadersGatewayFilterFactory | 删除重定向请求头的过滤器工厂 |
| RemoveResponseHeaderGatewayFilterFactory | 删除请求头的过滤器工厂 |
| RewritePathGatewayFilterFactory | 重写路径的过滤器工厂 |
| SaveSessionGatewayFilterFactory | 保存Session的过滤器工厂 |
| SecureHeadersGatewayFilterFactory | 安全头的过滤器工厂 |
| SetPathGatewayFilterFactory | 设置路径的过滤器工厂 |
| SetResponseHeaderGatewayFilterFactory | 设置响应头的过滤器工厂 |
| SetStatusGatewayFilterFactory | 设置状态的过滤器工厂 |
| StripPrefixGatewayFilterFactory | StripPrefix的过滤器工厂。表示在请求发送到下游之前从请求中剥离的路径个数。从左开始往右结束。 |
| RetryGatewayFilterFactory | 重试的过滤器工厂 |
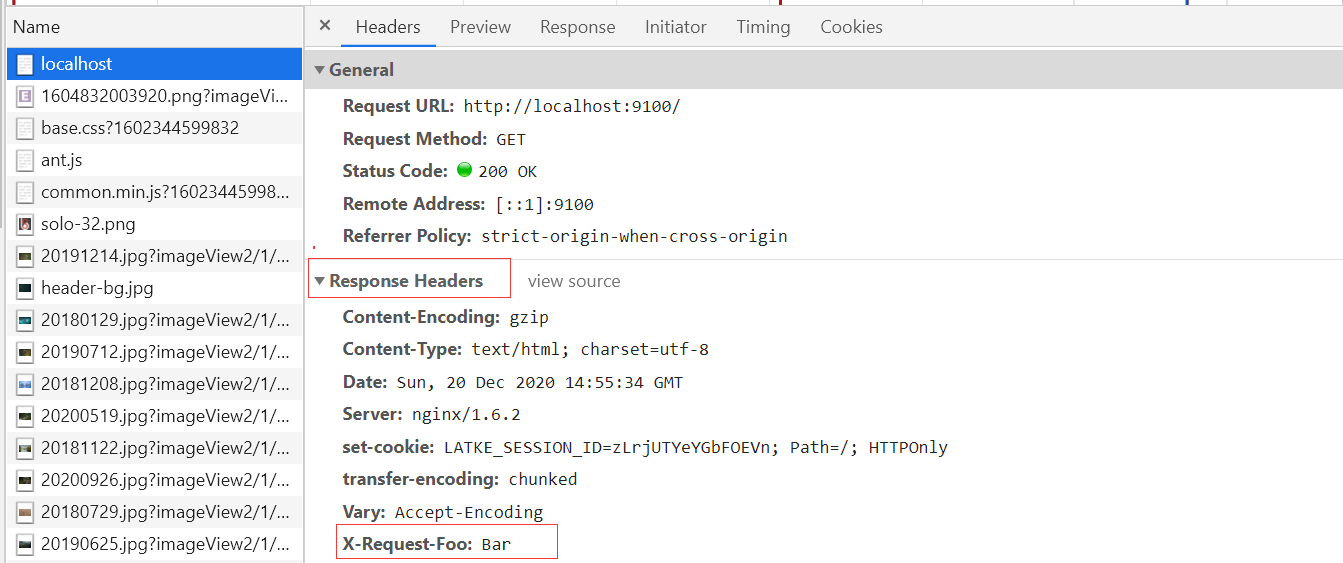
如下配置,是在指定的路由上添加响应头:X-Request-Foo=Bar
server:
  port: 9100
spring:
  cloud:
    gateway:
      routes:
        - id: add_request_header_route
          uri: http://www.shangsw.com
          filters:
            - AddResponseHeader=X-Request-Foo, Bar
          predicates:
            - Method=GET
此时访问就能看见响应头中存在的内容:
添加路由重试的过滤器如下:
spring:
    gateway:
      routes:
        - id: business;
          uri: http://www.shangsw.com
          filters:
            - name: Retry
              args:
                retries: 1
                statuses: BAD_GATEWAY
          predicates:
            - Method=GET
上述示例只允许重试一次,超过1次则报502错误。
结合StripFilter可以自定义请求路由的前缀(而不是使用默认的serviceId作为前缀路由):
server:
  port: 9100
spring:
  application:
    name: biz-gateway-service
  main:
    allow-bean-definition-overriding: true
  cloud:
    nacos:
      discovery:
        server-addr: 192.168.10.3:8849
        namespace: c5d2c515-9e06-4c31-b6d1-31102959cad4
        username: nacos
        password: nacos
        ip: 192.168.10.79
      config:
        server-addr: 192.168.10.3:8849
        file-extension: yml
        group: dev
        namespace: c5d2c515-9e06-4c31-b6d1-31102959cad4
        username: nacos
        password: nacos
    gateway:
      discovery:
        locator:
          enabled: false
      routes:
        - id: business-api-service
          uri: lb://business-api-service
          filters:
            - name: StripPrefix
              args:
                parts: 1
          predicates:
            - Path=/open-api/**
首先关闭自动路由的功能。然后使用Path匹配,匹配前缀为 /open-api的请求都路由到business-api-service微服务上,由于路径添加了/open-api,需要去掉,就使用StripPrefix过滤器进行过滤。
如果我请求:http://localhost:9100/open-api/v1/public/api/get/ip/addr ,则会路由上business-api-service服务上的/v1/public/api/get/ip/addr的接口上,去除了/open-api的请求路由头。
对于其他过滤器的使用,可自行查看源码进行研究。
2.2.1.1 自定义GatewayFilter
Spring Cloud Gateway的也可以自定义GatewayFilter,有两种方式:
- 实现GatewayFilter和Ordered接口,并重写filter()和getOrder()方法,filter()方法主要是业务逻辑。getOrder()方法表示顺序。值越大则优先级月底
- 继承AbstractGatewayFilterFactory类,然后重写apply()方法
如下,是使用实现GatewayFilter和Ordered的过滤器,过滤器功能是统计某个路由的处理时长:
过滤器代码如下:
@Slf4j
public class RouteTimeLengthGatewayFilter implements GatewayFilter, Ordered {
    private static final String COUNT_TIME = "countTime";

    @Override
    public Mono<Void> filter(ServerWebExchange exchange, GatewayFilterChain chain) {
        exchange.getAttributes().put(COUNT_TIME, System.currentTimeMillis());//刚开始路由的时间
        return chain.filter(exchange).then(Mono.fromRunnable(() -> {//使用线程处理
            Long startTime = Optional.ofNullable(exchange.getAttribute(COUNT_TIME)).map(time -> (Long)time).orElse(0L);
            long timeLength = System.currentTimeMillis() - startTime;
            log.info(exchange.getRequest().getURI().getRawPath() + ": " + timeLength + " ms");
        }));
    }

    @Override
    public int getOrder() {
        return 0;
    }
}
注册代码如下:
@Configuration
public class GlobalConfig {
    @Bean
    public RouteLocator routeLocator(RouteLocatorBuilder builder) {
        return builder.routes().route(r -> r.path("/business-web").uri("http://www.shangsw.com").id("business-web").filters(new RouteTimeLengthGatewayFilter())).build();
    }
}
而使用过滤器工厂完成上述的工作,代码如下:
@Slf4j
@Component
public class RouteTimeLengthGatewayFilterFactory extends AbstractGatewayFilterFactory<RouteTimeLengthGatewayFilterFactory.Config> {
    private static final String COUNT_TIME = "countTime";

    /** 切入点字段 */
    @Override
    public List<String> shortcutFieldOrder() {
        return Collections.singletonList("enabled");
    }

    public RouteTimeLengthGatewayFilterFactory() {
        super(Config.class);
    }

    @Override
    public GatewayFilter apply(Config config) {
        return (exchange, chain) -> {
            if (!config.isEnabled()) {
                chain.filter(exchange);
            }

            exchange.getAttributes().put(COUNT_TIME, System.currentTimeMillis());//刚开始路由的时间
            return chain.filter(exchange).then(Mono.fromRunnable(() -> {//使用线程处理
                Long startTime = Optional.ofNullable(exchange.getAttribute(COUNT_TIME)).map(time -> (Long)time).orElse(0L);
                long timeLength = System.currentTimeMillis() - startTime;
                log.info(exchange.getRequest().getURI().getRawPath() + ": " + timeLength + " ms");
            }));
        };
    }

    @Data
    public static class Config {
        /** 是否开启统计功能 */
        private boolean enabled;
    }
}
配置如下:
server:
  port: 9100
spring:
  cloud:
    gateway:
      routes:
        - id: bianjf-web
          uri: http://www.shangsw.com
          filters:
            - name: StripPrefix
              args:
                parts: 1
            - RouteTimeLength=true
          predicates:
            - Path=/bianjf-web
2.2.2 GlobalFilter
Spring Cloud Gateway框架内置的GlobalFilter如下:
- LoadBalancer
- LoadBalancerClientFilter:通过负载均衡客户端根据路由的URL解析转换成真实的请求URL
- HttpClient:通过HttpClient客户端转发请求真实的URL并将响应写入到当前的请求响应中
- NettyRoutingFilter
- NettyWriteResponseFilter
- Websocket
- WebsocketRoutingFilter:负责处理Websocket类型的请求响应信息
- ForwardPath
- ForwardPathFilter:解析路径,并将路径转发
- RouteToRequestUrl
- RouteToRequestUrlFilter:转换路由中的URI
- WebClient:通过WbeClient客户端转发请求真实的URL并将响应写入到当前的请求响应中
- WebClientHttpRoutingFilter
- WebClientWriteResponseFilter
内置的GlobalFilter能够满足很多场景的需求。如果不满足,可以自定义GlobalFilter。
如下,是自定义的GlobalFilter,是校验请求参数中是否包含“Authorization”的,如果没有则不转发路由:
@Slf4j
@Component
public class AuthorizeGlobalFilter implements GlobalFilter, Ordered {
    @Override
    public Mono<Void> filter(ServerWebExchange exchange, GatewayFilterChain chain) {
        String token = exchange.getRequest().getHeaders().getFirst(HttpHeaders.AUTHORIZATION);
        log.info("AuthorizeGlobalFilter -- token --> {}", token);
        if (StringUtils.isBlank(token)) {
            log.warn("AuthorizeGlobalFilter: token is empty ...");
            return exchange.getResponse().writeWith(Flux.just(exchange.getResponse().bufferFactory().wrap(JSONUtil.toJsonStr(StatusDTO.buildFailure("401", "请先登录", "请先授权")).getBytes())));
        }
        return chain.filter(exchange);//放行
    }

    @Override
    public int getOrder() {
        return 0;
    }
}


评论区